
Spring DIY | A Candle For All Seasons?
Friday, April 18, 2014
Since Spring is here, why not try a little DIY gel candle? Many of us change the theme and decorations of our room according to the seasons. Many of us are also candle junkies, so what better way to decorate your room than with a gel candle that can be changed according to the seasons to go with your room decor?
Things You'll Need:

- Gel wax (for candles)
- Candle wick (preferably those with a base)
- Container
- Pot
- Measuring jug/cup
- Chopstick/anything similar
Optional:

- Fragrance
- Flowers/pebbles/sand/seashells/anything you want to put in!
- Colouring
Steps:
1. Place one end of the candle wick at the bottom of the jar
2. Tape the other end of the wick to a pencil or chopstick and place it on top of the jar so it stays upright

3. Fill the jar with as many things as you want!
4. Heat the gel wax gently in a pot, but DON'T LET IT BOIL!

5. After the wax has liquified, you can add in your colouring and scent!
6. After everything is mixed, pour it SLOWLY (unless you want a really bubbly effect, which is so cool if you're going a beach/summer theme) into the jar
7. Once the candle firms up, you can remove the pencil and cut off the extra wick!
Here's an example that my friends and I did! We made this candle as a baptism (Christian rite) gift for our friend. We put blue potpourri about a quarter of the jar, then poured in just enough wax to cover it and waited for it to set, so the individual leaves won't start floating up. We also laminated her name and stuck it in, pressing it against the side. After that, we just added more wax layer by layer until it reached the top! We then added a few more bits of the potpourri and done!
We also decorated the cork lid by sticking a few pieces of potpourri and writing an encouraging phrase like so:


This was the end result!
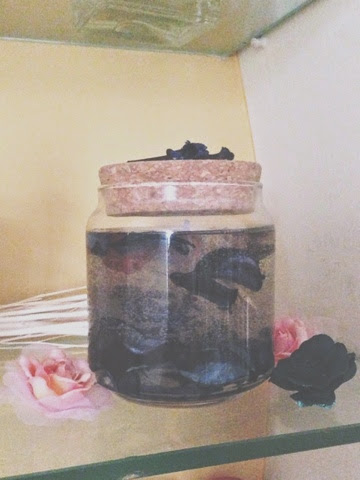

I know it isn't the best or the prettiest but hey, it was only our second try with the potpourri!
Tips:
1. You can also add colour after you have poured the wax (when it's still hot)!
2. If you want your items to float, you can pour a bit of wax, add a few items, pour wax, add more and so on and so forth!
3. There WILL be some bubbles when dealing with gel wax but nothing a little placing it in sunlight or warm oven can't handle! (more heat = less bubbles!)
4. If you want your items to be firmly at the bottom, pour wax about a quarter of the way and let it cool first! Then you can fill it up after!
5. Fresh flowers and branches are beautiful for Spring, sand and seashells for summer, pine cones, red autumn leaves and cinnamon sticks for autumn, pine needles, bit of holly (you can spray paint it with fake snow!) and tiny stream foam balls for winter!
6. Make sure the wax is 95% firm before removing the pencil from the wick, or else it might fall and sink!
7. Stir potpourri in when the wax has liquified to give a very subtle scent!
6. It might take a few tries but it definitely cures a boring/sick day!

What do you think of this simple gel candle DIY? Will you be trying it for yourself? Leave a comment! I'd love to read them! x


0 comments